You scored your first Cricut machine and it is the Explore Air 2, you were on the fence between this and the Maker so you took my previous advice and went with the beginner one. Solid choice my friend! Now let me ask you, have any idea where you should start or what you should do with it?
I didn’t think so. Right about now you are probably scouring the internet for how-to videos and posts, looking for anything remotely relative to the basics on getting started or learning your newly found best friend. Luckily for you, I am here to save the day (well kind of) with my Guide to Understanding the Explore Air 2.
We will cover items such as a guide of all the pieces and parts, what settings you can use and some of the tools that are compatible with the machine. As you may have already discovered there is a massive variety of blades, tools and supplies that you can use in your Cricut crafting but not all are compatible with every machine.
Lets begin!
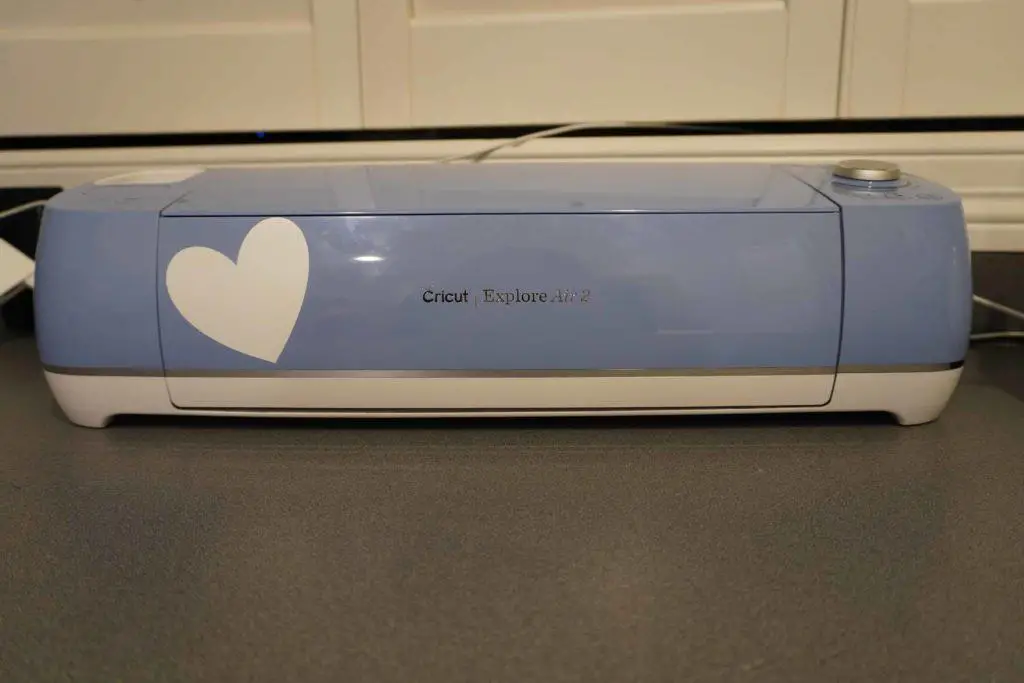
First looks at the Explore Air 2
You have your machine and your sitting there staring at it, I have witnessed this happen way more than I want to admit. When I got my machine I opened it right away, I was so excited to get started! Then as I pulled it out of the box and started setting it up the intense anxiety crept in, what the heck am I doing? I don’t know how to use this, what if I break it, oh god did I just waste $300??
After a few moments (hours really) I decided to give one of the vinyl starter packs a shot, worst case I ruin that and I am out $30ish and the machine will go back. Welp, here I am friends three years later and three machines later. I have had the Explore Air, and now I have added the Maker and the new Joy machines. I love these machines and am fascinated by all they can do!
Anywho, back to the subject at hand. Lets review your Explore Air 2 in depth shall we?
Cricut Explore Air 2 specs
- Weighs 16lbs (roughly)
- 24 X 9.5 X 9.5 so about the width of a countertop give or take
- Comes in various colors (vibrant and neutral)
- Compatible with older model Cricut Cartridges
- Bluetooth enabled and comes with an adapter for non-wireless connectivity
Cricut Explore Air 2 in the box
This is what comes in the box when you get just the machine, if you get a bundle deal from Amazon like the one linked above you get a whole lot more!
- $199 (roughly) at the time of writing
- Two weel trial of Cricut Access – read on that here
- Cricut Explore Air 2 Machine
- One Fine Point German Carbide Blade
- USB and Power Cords
- Accessory Adapter
- One 12×12 Standard Grip Mat
- One Fine Point Black Pen
- Material for First Project
That covers what you get with the machine and the general specs, let’s move on to exploring the outside of the machine now.
The machine outside
The outside of the Explore Air 2 is smooth and two-toned with silver accents. It has a spot to hold some tools on top (more hidden spots that we’ll cover in a few), a dial for settings, a slot for cartridges (a product from older models) and some buttons.

- Outside storage holder – great for quick access to pens and weeding tools.
- Cartridge slot – this is for the older model cartridges if you bought these for one of the original machines they are compatible with the Explore Air 2. Most of the older cartridges are available via Cricut Access but if you don’t want to purchase the subscription to it then this is a way to have the images and/or fonts.
- “Open” button – this button opens your machine, you can open it manually but using the button is way more fun, kind of like the automatic trunk in your car!
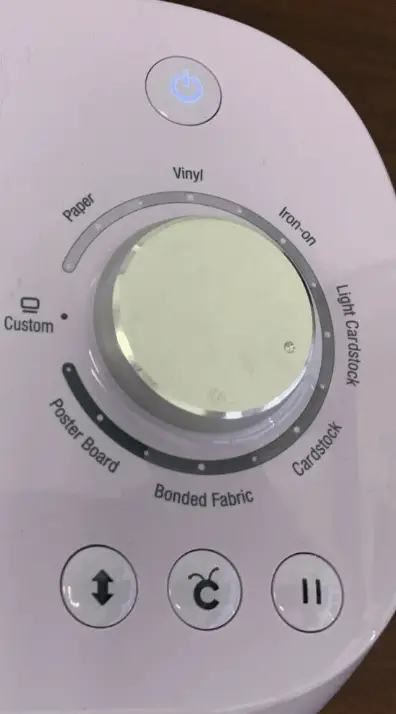
On the other side of the top of the machine you will see a dial and more buttons.
- Power button – obviously the button to power your machine on and off.
- Dial – this dial is how you select what material you will be cutting if you are cutting material other than the options available on the dial on can select “custom” and select from the options in Design Space.
- Load/Unload button – this is what you will push when you want to load or unload your mats.
- Cricut Logo button – yes it is a button, not just the logo haha. After you have loaded your mat you push this button to start your cut.
- Pause button – not many people realize that you can pause your cut. I recently discovered this when I was cutting some faux leather and the material started to bunch up and out of panic I pushed the pause button. Don’t be afraid to use it, if you push it you can go back to the cut as long as you don’t unload your mat.
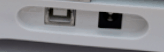
- USB port – this is how you connect your machine if you don’t want to use Bluetooth. You plug the adapter into your computers USB drive.
- Power port – this is where the power cord gets plugged in so your machine ha go-go juice.
That covers the outside of the Explore Air 2, now for the inside goods!
The machine inside
As you hit that “open” button you will be in awe and have a tad bit of “oh shiii” all at once. The inside of the Cricut machines look simple until you really look at them, rollers, housings and belts it looks like something that should be in a warehouse making mass produced items but more clean and simplistic. Can you really accomplish both of those? Cricut has from the very beginning.
They have really put a ton of thought in the design and functionality of their machines. The Explore Air 2 was really their stepping stone into a less bulky typewriter looking machine, a more modern look shall we say.
The first thing you will notice when you open the machine is the housing units. You will see they are labels “A” and “B”.
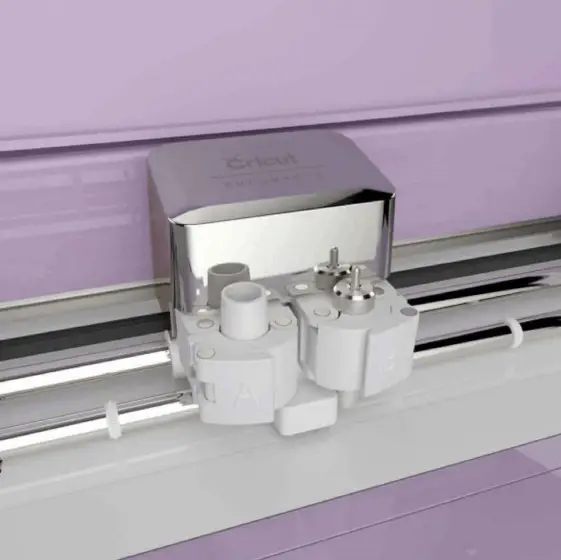
- Housing unit A is for the scoring stylus, pens, and markers, you can not put a blade in this slot, you won’t get very far, the machine will yell at you, well Design Space will give you a notification.
- Housing unit B is for blades, there are several different blades that are compatible with the Explore Air 2. You can read about all of those and other compatible tools for all the Cricut machines here.
Then we have the rollers and belt. These are both pretty much serve obvious purposes but in case you weren’t sure.
Rollers – these are used to pull the mats in and out of the machine while the blade spins and cuts. They also support the housing units.
Belt – this pulls the housing units left to right to create cuts. I for one never want to even imagine how to replace this bad boy.
That is not all the inside of this amazing machine holds, it holds a secret compartment…
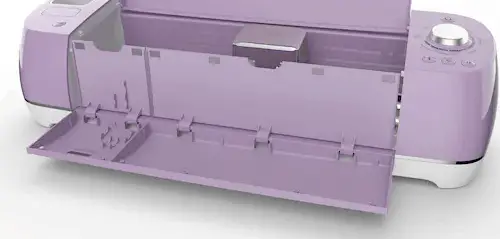
If you open up your machine and look at the bottom piece that most people think is just for the mat to sit nicely and be supported, it is not! look closer…it opens and there is space for pens, weeding tools, scrapers, and even blade storage! I can’t believe the number of people that had no idea about this! Madness I tell you!
What can it do?
Alright, so now we have covered the outside and the inside of the machine. I cover all of the tools you can use with the Explore Air 2 and other Cricut machines here. Now I want to talk briefly about some of the projects that the Explore Air can do!
The Explore Air 2 has come a long way since the original cutters, from being digital and not needing the cartridges to being able to cut so many different materials. Here is a short list of some of the things you can make!
- Cards – design, create and customize your own greeting cards! This is one of my favorite things to do. Being able to make someone feel more special on any day is amazing. The other perk, it will save you mad $$ on cards.
- Shirts and other custom apparel – Iron-On is awesome, you can create some of the most amazing things with it. I am really big into working out and get really motivated when I have a fun and usually vulgar shirt on. My favorite shirts are the ones I make!
- Jewelry – the Explore Air 2 can cut SOME fabric, if the fabric has a cotton back it can be cut. For example you can cut faux leather and make earrings, necklaces and bracelets out of it!
- Wall Decals – you can use removable vinyl to personalize your home, make a family tree wall, create something awesome and completely personalized to your own tastes for your walls. Think about the kids’ room, what kid wouldn’t want their walls covered in Marvel heroes, Disney princesses or Harry Potter?
- Posters – remember those pesky posters you had to make in school, well chances are if you have a kiddo those days aren’t over and just buying the same old letters that everyone else has is just boring. Design your own with the Explore Air 2! Just pick a font you like and cut some poster board. Super easy and fun!
This is just a few of my favorite projects you can do! Not even close to everything it can do. Here are a few things I did with the Explore Air before I made the switch.


Plus many, many more. I am obsessed with making things, it is so much fun and a form of stress relief. I hope that you too can become obsessed and love your machine as much as I do.
Now you know most of the basics about the Explore Air 2, you can get out there and start creating your own happiness. Don’t be afraid to try new things, you never know what you are capable of unless you try it!
Be sure to check out some other nifty functional craft ideas through our other posts here on Craft-ILY as well as checking out some videos on DIY and How To’s over on YouTube. Look for “Crafting Unedited” to see!
Happy creating!