As you play around more and more with sublimation your mind is going to start wandering off into the “can I sublimate on this or that” realm. One of the most popular “can I sublimate on that” is cotton, there is a lot of controversy on it and many will say the answer is no and technically I agree but logistically I don’t.
The reality is that you can sublimate onto cotton, the key word there is ON not into, I will explain more on that later. In this article you will learn how to sublimate on cotton, logistically speaking that is. There are several ways you can sublimate on cotton using EasySubli, glitter HTV, clear HTV and Siser glow HTV. I will explain each and give you the instructions on how to do it on your own.
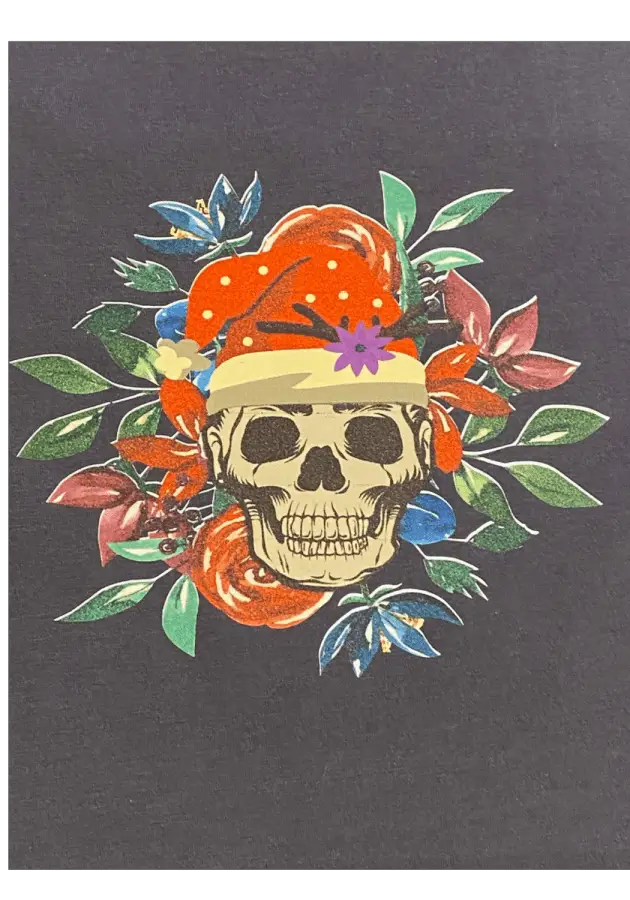
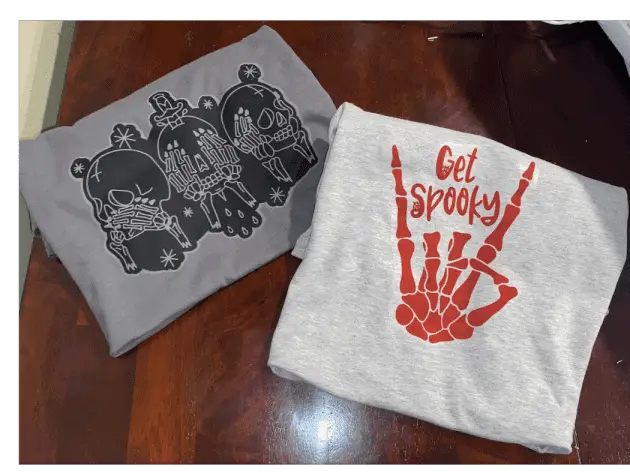
There are many reasons as to why you might want to sublimate on cotton but the main reason is you want a specific image on a darker shirt but you do not want to go through the process of all of the layering or to have to outsource the image for a screen print.
Siser EasySubli
Siser EasySubli is one of the most commonly used tricks for sublimating onto cotton with. If you can get your hands on it, it is also one of the best methods. EasySubli is a vinyl type product that needs cut and weeded just like HTV. The quality of the sublimation transfer onto EasySubli is outstanding, it is just as vibrant and detailed as if you were sublimating directly onto a 100% polyester shirt.
How to use EasySubli:
- Print your image using your sublimation printer and cut your image from Design Space using the print then cut technique and your Cricut machine. You do NOT mirror this.
- Weed the excess material like you would any other iron on vinyl.
- Remove the EasySubli liner from the mask and place the mask on top of EasySubli and burnish using a squeegie removing all air pockets.
- Preheat the substrate for 5 seconds.
- Lift mask and EasySubli from the backing and place on your substrate where you want to press.
- Place the butcher paper or teflon sheet on top and press at 311 degrees with medium pressure for 15 seconds.
- Warm peel and boom you are finished.
Glitter HTV
For those of us that love glitz and glam glitter HTV is the way to go. I absolutely love using glitter htv and even permanent glitter for everything! Sublimating on glitter HTV is amazing! The colors turn out just as they do when you sublimate onto 100% polyester but with this you get added sparkle. The reason for this is that the glitter HTV is made from a polyester base.

How to use glitter HTV for sublimation on to cotton:
- Using Cricut Design Space do a “print then cut” image as well as an offset “basic cut” image. The print then cut will be printed using your sublimation printer and the basic cut offset will be used for the glitter HTV. You MUST mirror this one.
- Weed the excess from your offset cut.
- Preheat your substrate for 5 seconds then press your glitter HTV at 380 for 7 seconds (just long enough to tack it) with medium pressure. Warm peel when done.
- Align the sublimation transfer to the glitter HTV, getting it as close as you can to the edges of the glitter HTV.
- Tape the sublimation transfer to the substrate and cover with butcher paper.
- Press for 60 seconds at 380 degrees
- Remove butcher paper and sublimation paper/tape.
- Boom your done!
Clear HTV
Using clear HTV as a base for sublimation transfers is pure genius. Granted you can still only use this method for lighter color substrates where with glitter and EasySubli you can use any color substrate. Using clear HTV is the way to go if you want a light colored cotton substrate to have a very detailed image applied to it.
How to use clear HTV for sublimation on to cotton:
- Make sure you check the side you need to cut, it will be the glossier side of the sheet.
- Using Cricut Design Space do a “print then cut” image as well as an offset “basic cut” image. The print then cut will be printed using your sublimation printer and the basic cut offset will be used for the clear HTV. You MUST mirror this one.
- Weed the excess from your offset cut.
- Preheat your substrate for 5 seconds then press your clear HTV at 325 for 10-15 seconds (just long enough to tack it) with medium pressure. COLD peel when done, it has to be completely cooled. If it does not release you may have to peel it off the backing at the edges some to release it. If it stretches some it is ok, it will rebound once pressed for sublimation.
- Align the sublimation transfer to the clear HTV, getting it as close as you can to the edges of the clear HTV.
- Tape the sublimation transfer to the substrate and cover with butcher paper.
- Press for 60 seconds at 380 degrees
- Remove butcher paper and sublimation paper/tape.
- Boom your done!
Siser Glow HTV
Siser glow HTV is definitely a fun one to use! Not only does it give a pretty decent transfer (some colors are a bit muted) but you get an awesome effect when you turn off the lights! So if you have a spooky or even any design and you want to give it more boost, this is a sure fire win.


- Using Cricut Design Space do a “print then cut” image as well as an offset “basic cut” image. The print then cut will be printed using your sublimation printer and the basic cut offset will be used for the Siser Glow HTV. You MUST mirror this one.
- Weed the excess from your offset cut.
- Preheat your substrate for 5 seconds then press your Siser Glow HTV at 380 for 5 seconds (just long enough to tack it) with medium pressure. COLD peel when done, it has to be completely cooled. If it does not release you may have to peel it off the backing at the edges some to release it. If it stretches some it is ok, it will rebound once pressed for sublimation.
- Align the sublimation transfer to the Siser Glow HTV, getting it as close as you can to the edges of the Siser Glow HTV
- Tape the sublimation transfer to the substrate and cover with butcher paper.
- Press for 60 seconds at 380 degrees
- Remove butcher paper and sublimation paper/tape.
- Boom your done!
To Conclude
You now know all of my secrets to sublimating onto cotton using different types of vinyl! While they are not truly sublimating onto the fabric these are all solid ways to get a pretty similar look. You CAN use a product that some use often which is a poly spray but I don’t like to recommend those due to the face that they do not last very long. Drop me a comment and let me know YOUR favorite trick to sublimating onto cotton.
Before you get too into the tips side of things, you will probably want to take a quick review on what you need to get started. You can check out my post on full details here –
Here are some super useful sites and tools for getting your images free of copyright issues:
Design Bundles – designbundles.net offers thousands of SVG’s sublimation images, brushes and fonts for ProCreate and so much more. The inexpensive monthly plus plan is the best way to go, you get tons of free credits to purchase their “plus”products that come with the commercial use license.
Design Space/Cricut Access – If you use Cricut you have access for $11/month to thousands of fonts and images as well. I always search Design Space for what I am looking for first, this way I don’t have to go through all the steps of uploading and what not.
I also use JPIBlanks.com for images often as well. They design the images/files themselves so the copyright is released when you purchase the image/file from them. Sometimes they will even do a coupon code for free images!
Be sure to check out some other nifty functional craft ideas through our other posts here on Craft-ILY as well as checking out some videos on DIY and How To’s over on YouTube. Look for “Crafting Unedited” or just click the name in blue to see!