Of all the features Cricut’s Design Space holds, the most confusing and difficult one to master is the print then cut feature. For some wild reason crafters get so lost, confused, and stressed out using it, I was there and now I am here to share with you some really incredible beginner projects you can make using the print then cut feature.
All of the following projects are easy and some are even pretty quick to learn and try too! You can always hop on over to my YouTube channel @craftingunedited and watch the tutorials on each project as well. Visualization is easier for me to learn, maybe for you too.
Let’s get you started off on the right foot by covering what kinds of supplies you will need to work on these projects. So that when you are ready to start them you have everything you need ready to go.
Supplies
As with all projects you’ll be needing some supplies. Here is the list, with links for everything you will need!
- Cricut cutting machine – I have the Maker and Joy and love them both, however for anything with the print then cut feature I use my maker, the Joy allows even less printing space (we will get to this in a minute).
- Light grip mat and standard grip mat
- Printable label paper – I use full sheet labels from Amazon, this pack is 100 sheet and have been amazing.
- Printable Iron-On transfer sheets for light and dark fabrics
- Cont-Tact Brand contact paper – in matte or glossy
- Weeding tools
- Scissors
- Felt sided scraping tool
- A huge imagination
You can check out the tutorials on each of these projects by simply clicking on the title to each one and it will take you right to it!
A few notes to keep in mind
- Print then cut feature only allows a 9.25″ by 6.75″ print space, regardless of your paper size. There are ways around this if you want a bigger decal or more print space but it does not always work. For the in depth explanation of this go here to the Creating Stickers with your Cricut post and I will tell ya all about it.
- The Con-Tact paper will allow you to not only give your finished product a sheen but it will also protect the ink from running if it gets wet. I just recently discovered this trick!
- Make sure you follow the instructions I give on each process completely, failure can result in a mess.
- The image your print will never be as vibrant as your screen shows, to get it to the brightest possible image make sure your printer has adequate ink supply and you allow your image to dry completely before handling. I would say give it at least half an hour.
- Do not give up if you fail, just keep trying!
Projects
Stickers!
Who doesn’t love fun stickers? Stickers are an easy way to express yourself, your hobbies, your mood and more! With the Cricut machines and Design Space you can find thousands of quotes, images, create your own images and even make picture stickers. The possibilities of making unique stickers with the print then cut feature are pretty much endless.
When I first started making stickers I did not know there was a way to make them glossy unless I got the glossy paper and I am not a fan of that, so I would just use the regular label paper and leave them as is. Now I know you can add a layer of contact paper or even transfer tape to the sheet before you cut and your Cricut will cut it to the same size as your stickers!
Check out this post on how to make stickers for the full tutorial.
Labels!
Label everything, my once super OCD self thought as she started working on her newly found friend the Cricut Explore Air 2. While I don’t recommend labeling EVERYTHING anymore, I do recommend labeling a few things and this print then cut feature made making boring, plain labels so much more stylish, chic, and fun!
Here are a few ideas of things you should definitely get on to labeling right away:
- Charging cables, we have an abundance of iPhone phones, iPad, and AirPod chargers all over the place and it is a constant battle between the kids of whose is whose. I had enough and went a little label crazy on them.
- Pantry Containers – white sugar, brown sugar, white flour, wheat flour, tea, coffee, rice, etc. This will not only help you but will also help the spouse or kiddos when looking for ingredients for recipes when they start to venture into cooking on their own.
- Bins – all the bins! Bathroom supplies, sheet sizes, first aid stuff, there are so many things you can label in your home to make it more organized but not tacky.
Detailed Apparel!
Apparel is one of the most popular Cricut crafts, you can customize just about anything fabric-based you want. Here are just a few examples of what I have played around with making and seem to be pretty popular.
If you want something really detailed and has lots of tiny details at that, the print then cut feature for apparel is your best bet. Attempting to layer that many colors and pieces would land me a spot in the emergency room for a migraine.
T-Shirts – designing t-shirts is by far my favorite thing to do. The process is so easy and fun. you can use them to express yourself or mood, you can make some really fun ones for your kiddos with their favorite characters or even family photos!
Let’s not mention business merchandise, shirts are the best way to get your name out there, lots of businesses give away free shirts because they know they will get worn, it is basically a walking billboard and free advertising.
Hats – Know a guy or gal that loves wearing baseball caps? Making hats is pretty awesome (a bit more tricky than shirts but worth the struggle in the end). These are another great way to advertise as well. Kids, men, and women all like hats and they keep the suns rays out of your face so they get used quite a bit too.
Bags – Ah, bags! What girl doesn’t love bags? I do that is for sure!! Being able to customize them is seriously fun, and I am not just talking about handbags, but also reusable grocery bags and beach bags and canvas whatever bags, all the bags! I did one recently and it is the best, I get so many compliments on it every time I use it.
Aprons – This is something not many realize they can personalize. Aprons make great gifts for many occasions! Fathers Day – make a grilling themed apron, Mothers Day – design a baking-themed one, Birthdays – make a cake baking or decorating one, got kiddos? – make a painting cape or art apron, there are so many things you can do with them!
You can use print then cut images on anything you can use regular iron-on or HTV on, there are so many possibilities with it!
Just a few things to keep in mind when using print then cut for apparel:
- remember to mirror for light-colored transfers, not for dark color transfers (they are different so make sure when purchasing you get the right ones) I prefer to use these from JPI, they are really good and the backing is different colors making it easy to remember which is for dark and which is for light.
- when you run through your Cricut machine always double-check before hitting the “unload” button that way if it needs an additional cut it follows the same path. Not all transfers cut through the first pass.
- always remember to let the decal dry on the printer for a minute or two before handling, I let it sit for ten minutes or so.
- print then cut is a COLD peel transfer, meaning it has to be completely cooled after being pressed before you pull the backing off.
These are all tips I have learned along the way of my crafting journey so far, if you have any useful tips you would like to share with me feel free to drop a comment below so I can learn more.
I love sharing my ideas, tips and tricks with you all. If you have any struggles or an idea you need help with leave a comment and I would be happy to help you.
How to get started
Here is a brief tutorial on how to get started with print then cut. Most of the process for each of the projects listed will start this way as well.
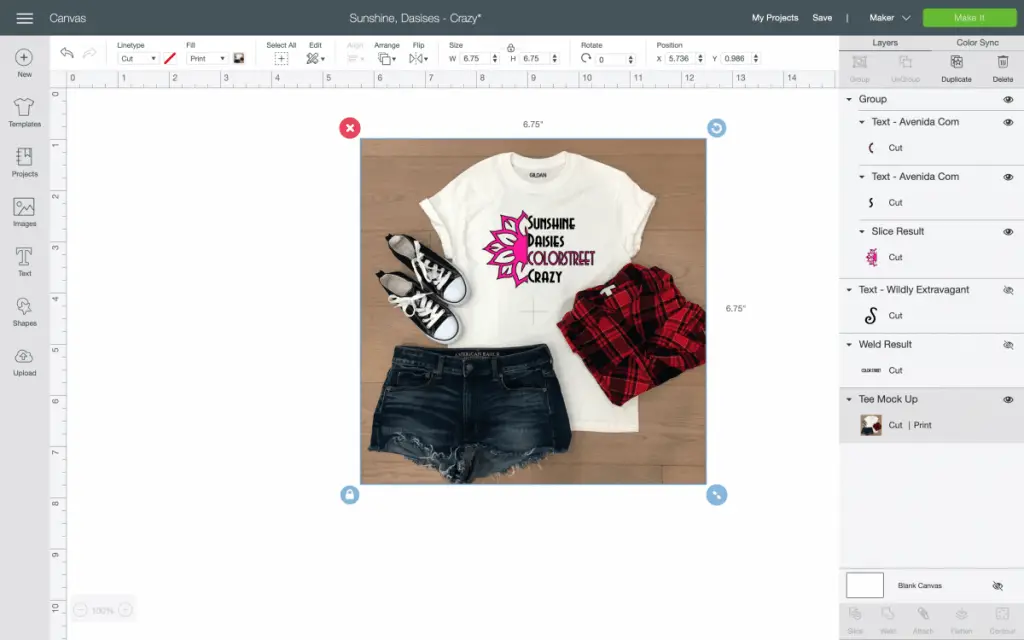
First, you will want to get all your supplies ready, make sure you have your printer filled with ink. Once you have done that you will want to make sure you know which way to put your paper in.
Once you’ve done this you are ready to print your decal. This is assuming you have already created your design and are this far without me (hehe). This is what your screen should look like but with your design of course.
Next you will select make it in the top right corner.
Now you will run a test print on a plain sheet of paper. On one side write “face down” and put that side face down on your printer. Then print, this step avoids you printing on the wrong side of your transfer.
Now your screen should look like this:
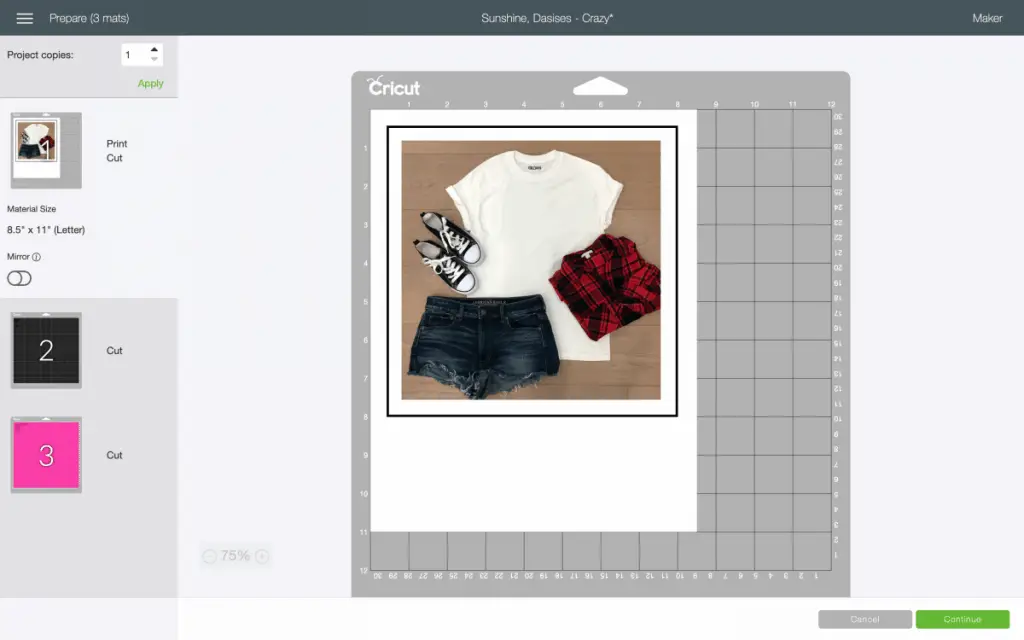
Now this is where you select “mirror” then you will select “continue” (green button in bottom right corner)
Your screen looks like this now:
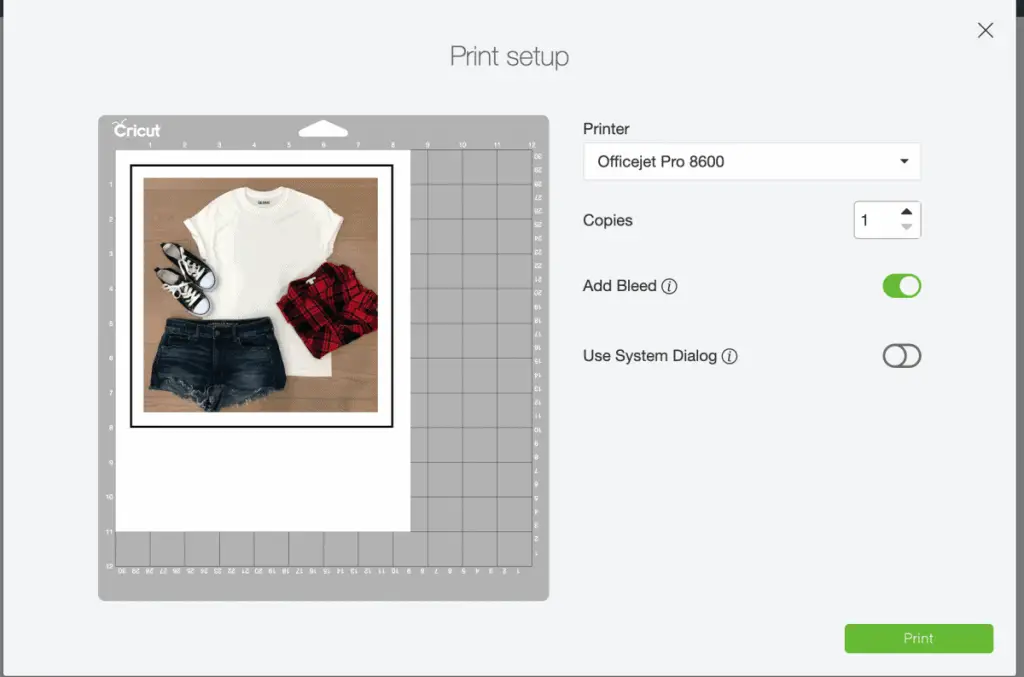
Here is where you can see your print settings, you’ll select your printer, select how many copies you want and if you want to add bleed to it (additional ink coverage around your image to prevent white spots) I always leave bleed on, it is up to you. The excess will be cut off when you put it in your machine.
After you hit print your image will print. Then you will be ready to finish your project! For additional steps be sure to click on the project you want to complete for a full tutorial. They are all linked back to the matching tutorial for you!
Be sure to check out some other nifty functional craft ideas through our other posts here on Craft-ILY as well as checking out some videos on DIY and How To’s over on YouTube. Look for “Crafting Unedited” to see!