So, you got a Cricut and you are so excited to start using it and making all things custom. But wait…it doesn’t exactly come with an instruction manual for all of the various things you can make. The only manual it comes with is the how to plug it in and then it directs you to the Design Space website.
Now of course there are lots of how to guides there, but to me they are all professionally typed by someone who isn’t a real crafter (just my personal opinion, who knows they might be!). I need a “crafting for dummies” version and so far I’ve managed to follow a few YouTube videos and do my own thing (i.e. make my own version of a how to guide on everything I have made so far using my Cricut Air Explore 2 and other Cricut tools.
Don’t have a Cricut yet but thinking about it? Purchase one today (you will not regret it!). I made a few YouTube videos introducing my machine and will write some tutorials about that later. For now, I am here to thoroughly walk you through the steps and details of using HTV and making your very first custom tee!

First, we’ll start with some details on some of the products you will be using:
HTV – see below
Cricut tools needed – mat, weeding tool, machine and Heat Press (this will be covered briefly for the purpose of use, for a more in-depth overview stay tuned for future posts.) All of which you can purchase here on Amazon.
Shirt – I prefer using cotton or a cotton blend of shirt, it’s less hassle and stress if the material will melt or discolor upon heating.
Scissors or a rotary cutter – or both whichever you prefer
Let’s dive right in, shall we?
HTV, What’s that??
If you are totally new to the crafting world then you might be wondering what the heck (or other words) is HTV? Well, HTV stands for Heat Transfer Vinyl or you might know it as Iron On Vinyl. There are many different types and brands of vinyl, but we will get to that in a minute.
HTV is an adhesive vinyl that is activated (on one side) buy high heat. One side of the vinyl is typically shiny and has a plastic backing, kind of like a sticker and the other side isn’t. The side that isn’t is the “adhesive side”, this is the side you will be placing on to the shirt when the time comes. The other side is to prevent you from melting the vinyl with the heat, trust me…it gets UGLY!
There are HOW MANY types?
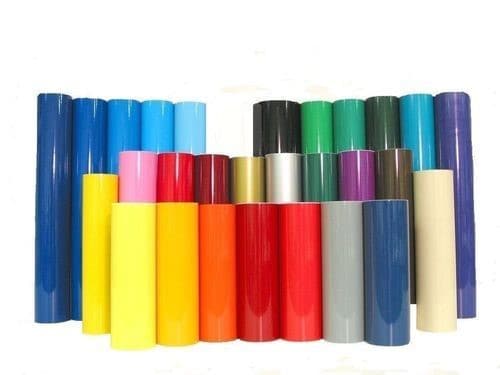
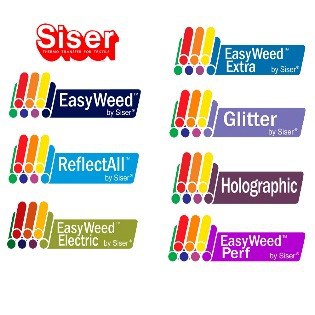
There are many types of HTV, and they all work VERY differently. Depending on the brand the cost per roll can be anywhere between $14 and $22. I personally prefer Siser Easy Weed over most brands for several reasons but the main is that the rolls are 2-3 times the size of most rolls AND you can coupon stack! I love Cricut but they eliminate themselves from all coupons and to me that’s not cool.
First you have your basic HTV which is a solid color and the most commonly used for everything because it is super versatile and can be used for lots of projects. Then we get into the fun stuff, glitter HTV, holographic, metallic, patterned and so on. There is also a printable HTV which is pretty cool, you can use it to print your own patterns and images without layering (another topic!). The more flamboyant and fun can also be used for many projects but when it when it comes to ease of use on these, they are all different. I will sum it up in a few words for each for you.
Glitter HTV – depending on what brand you use, and color glitter is one of the prettiest but also most difficult to weed, don’t worry I will explain what weeding means in a moment. I absolutely love glitter HTV, but let’s be honest what girl doesn’t love all things shiny?
The difficulty comes from being able to see where to pull the needed vinyl from the not needed vinyl (the weeding process). You see when you cut the image and remove it from the machine it is very difficult to see what areas what are what so it becomes a bit of a guessing game unless you’ve got great eyes and can see the line. Cricut does have a product that can help with this called the Bright Pad I have seen this thing in action and it works really well, I just don’t need one because I’ve got superwoman senses.
Holographic HTV – this one is super neat looking once applied (well before too) but the trick to using this one is temperature. It all comes down to low and slow here, you want to set the temp on the Cricut Easy Press or your household iron (I 100% recommend using an Easy Press on all of your iron on projects for several reasons). But you want to keep the temp at less than 275 for this and cover it in slow spurts. The longer and higher the heat is set the hotter this HTV gets, this is the same for all HTV but due to the thinness of this one it causes it to wrinkle and QUICK. So just remember low and slow. Same thing for the metallic HTV – low and slow.
Stretch or flex HTV – this is great for sports jerseys or fitted shirts, it is super stretchy and will not pull apart when stretched out over larger body parts…ahem the girls for instance. It also withstands the higher heat when applying so no worries there. The only issue I’ve ever encountered with this is that it can be a bit difficult to get off of the backing during the weeding process.
Easyweed or Patterned HTV – the easiest HTV ever. Period. Withstands high heat, easy to weed, colors are amazing and easily distinguished areas to weed.
Now that we have covered all the types of HTV lets move right along to preparing your project.
You will need a computer, clear workspace and an ironing board or a towel on a FLAT surface.
These steps are assuming that you have already created your image using Cricut Design Space, if you have not done this that’s ok, this article will help you know what you need to do once you have your design ready! Also, I will probably make a post on how to navigate through Design Space once I figure out how to get the screen to show up well on the camera.
Back to the Prep
you have your work area, computer, supplies and surface ready right? Ok, good we are ready to go.
Next we will prep the HTV. For this step you will need your Cricut Mat, the HTV and the rotary cutter or scissors. You will need to measure out your HTV using the guidelines on Design Space (conveniently they match the lines on the Cricut Mat!) You could always just use a whole sheet but I like to savor my vinyl, no matter what kind #savethescraps . So I will typically cut almost exactly what I need and not much more.
When you place the HTV on the mat to measure you want to make sure that it has the SHINY side down, remember this is the side that has the plastic backing on it. I made this mistake a few times before getting in the habit of remembering this. You will need to adjust the smart dial to “Iron On” setting:
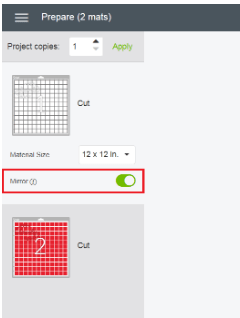
Once you have the HTV measured and in place you will want to make sure you select “mirror image” in Design Space, it looks like this:
This is also how you want to load the mat into the Cricut machine. Once you have done that you are ready to get cutting!
One more tip: when placing the HTV on the mat you want to make sure that you align it to the top of the mat, there is nothing that say “top” on the mat, your indicator is the hanging hole that looks like this:

Now you’re ready to cut!
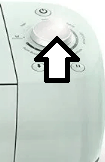
You’ve got your image and HTV all prepped and are ready to get to work, well let the machine get to work anyway. Now you will load the mat into the machine with the hanging hole facing the machine and using the guides to set you in place. Once set you will hit continue in Design Space then you will be prompted to push the flashing up/down arrow which will feed the mat into the machine and looks like so:
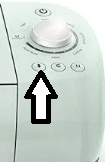
After that the “C” button should be flashing, go ahead and press it. Once you press the go button don’t panic if you notice a mistake such as the HTV being on the wrong side, there is a pause button and it looks like a normal pause button, just press it and unload the mat. Then fix the vinyl and replace the mat press load, and go! When the machine is done it will beep and Design Space will notify you. Then you can unload your mat, press “finish” in Design Space and you now have a complete cut and are ready for the last step before applying your image – woo!
Weeding…I told you we’d chat about this ? think of it like weeding your flower beds, you’re going to pull away the area that you don’t want or the extra vinyl. When weeding the image, you want to keep it on the mat and use a weeding tool (see tools above), I like to start with grabbing a corner and pull from the edge. If your image has a bunch of letters in it, you might find it easier to pull from the bottom up rather than top own. The key thing to remember here is to pull slowly and make sure you get out all the unnecessary vinyl or it could end with you having to remove after sealing and that isn’t a fun process. Once you have your image fully weeded you can move on to the final step!
Let’s finish this thing! You should have your shirt laid out on a flat surface with a mat, towel or something under it or an ironing board. An ironing board is best. First you will want to remove any wrinkles in the area of the decal placement. Wrinkles can cause major issues, so I like to be sure there are none on the front or the back to avoid anything getting stuck together.
Now that we are wrinkle free you can start placing your decal on the shirt. I like to eyeball this part; some people like to measure it all out or use a t-ruler (not even entirely sure what it is called). For me, I have a good eye for making things pretty straight unless you ask me to cut something in a straight line then you’re screwed. After you have your decal laid out on your shirt you are ready to apply heat!
If you are using a Cricut Easy Press you will want to preheat it and depending on the type of HTV you used, you’ll want to set it accordingly. If using easyweed, stretch or basic you can set it to 325, if you are using glitter HTV set it to 350, if using holographic HTV set it no higher than 250. If using a basic household iron, you will need to make sure the steam is turned OFF, steam will ruin the image so be sure it is OFF and set it to cotton. I highly recommend using a sheet of wax paper as a layer of safety, as well as for a last “heat set” as I like to call it.
Then you can begin the application by placing the wax paper on the image and placing the Easy Press on top of the wax paper. Using the timer setting on the Easy Press (should auto set to 30s) apply a tad bit of pressure to the press and wait. Giving it the 30 seconds per area of decal, then repeating (this typically takes about 2 minutes total depending on the size and type of HTV used). You can test the image readiness by pulling a small corner off here and there. Once the sticky plastic pulls off easily from the HTV you are good.
For glitter HTV I pull while hot, for anything else I give it a few seconds to cool, this avoids bubbles in the basic HTV. Then this is where my extra step comes in, it is not needed but I take the sheet of wax paper and place it over the image without the plastic backing and apply one more round of heat just to verify it is sealed (THIS DOES NOT APPLY TO USING PRINTABLE HTV), with printable HTV it is totally different and the image will melt. Once this step is complete you are finished! I like to turn my shirts inside out and go over I with the iron to remove any wrinkles (but remember to turn it inside out if you do this!) for the customer, so they have a ready to wear product.
If you enjoyed this How-To guide, let me know! Leave a comment ? also check me out on YouTube to some really fun video How-To’s here.