Mug sublimation is a fun and relatively easy way to make personalized items with your own designs and graphics. Whether you want to make customized mugs for fun, start a business, or create a promotional item or gift for a customer, mug sublimation is the way to go. But what do you need? How long does it take?
You should heat-press most ceramic mugs for sublimation for 150-210 seconds using a medium pressure at 350-400°F (176.66-204.44°C). However, how long a heat-press is can change based on the specific ceramic mug blank you’re using.

The rest of this article details what sublimation is, what materials you need, the process of sublimating a ceramic mug, and how long you should heat press a mug. If you want to start personalizing your mugs, or you’re looking to start a small business, keep reading!
How Long To Heat Press a Mug
Sublimation is a popular kind of printing for transferring a design into a material. The process uses heat to bring the ink and material together as one, so the design is imprinted on the material.
A design is first printed on special sublimation paper, and inks are turned into gas and combined with the material or fabric to print. The process is similar to the process of getting a tattoo, but instead of ink combining with skin, ink is combined with a product, like a mug or a shirt.
For this to properly work, temperature, time, and pressure must all be appropriate for the particular item being heat-pressed.
In general, ceramic mugs should be heat-pressed for 150-210 seconds. This is typically at 350-400°F (176.66-204.44°C) with medium pressure.
Nonetheless, companies that sell mugs designed for sublimation also provide guides for how long to heat press them, so always check to see if your mugs came with any suggestions. Companies like Heat Transfer Warehouse have specific product instructions listed on each product page, most even have videos too!
Materials Needed for Sublimation
To properly perform the heat press to sublimate a mug, you’ll need the following materials:
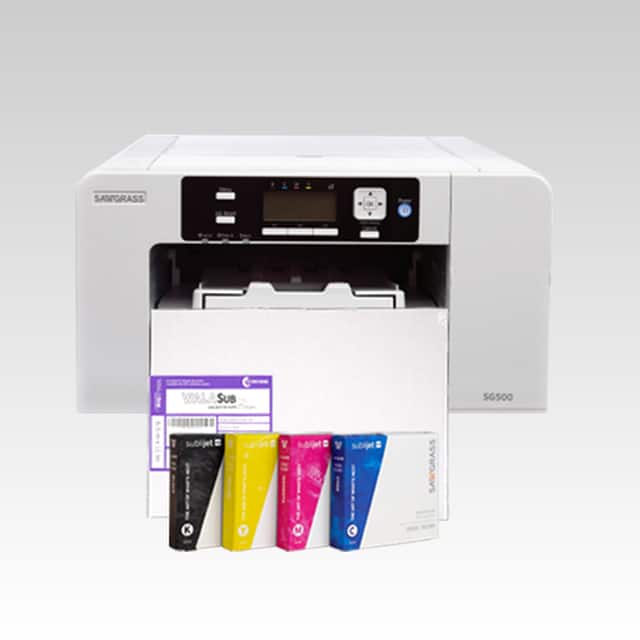
- Sublimation printer: The right sublimation printer for you depends on what you want to make and how much space you have available. A small desktop printer may work for you if you’re only looking to do smaller items, like mugs. I like the Sawgrass SG500 Sublimation Printer(available at Heat Transfer Warehouse) because it fits comfortably on my desk and works well for smaller items.
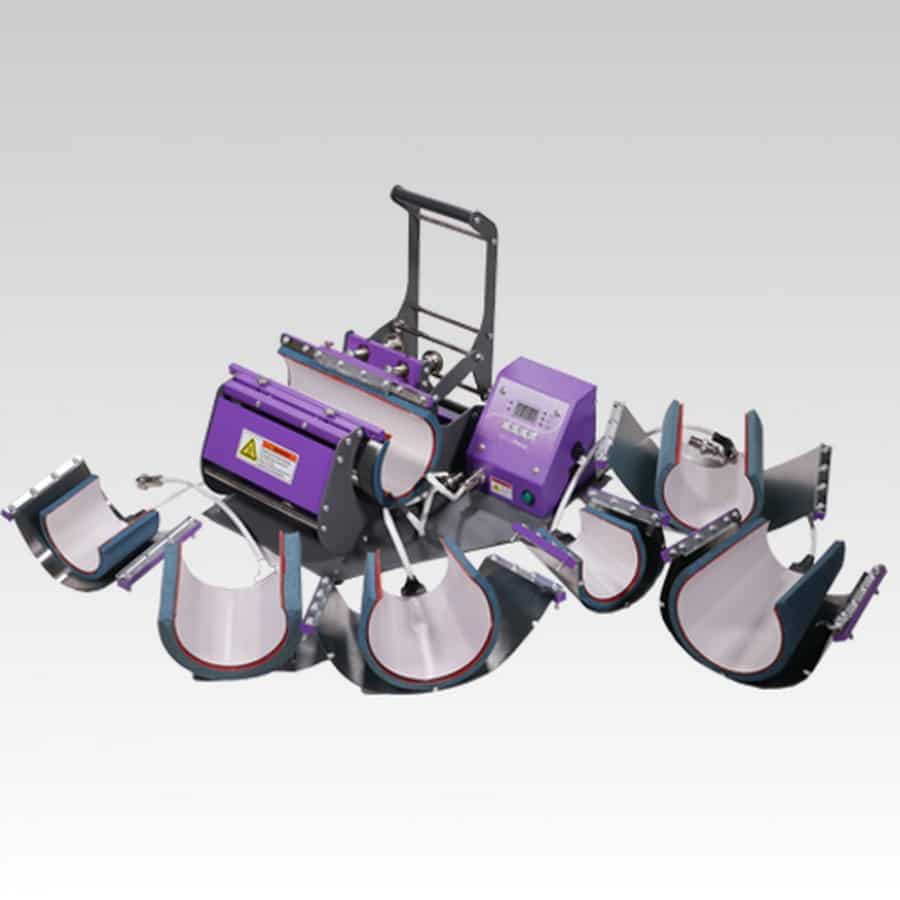
- Mug press machine: I like the Geo Knight Heat Press DK3 (available at Heat Transfer Warehouse) because it accommodates all mugs available on the market, and the press opens extra wide, so loading is easy.
- Blank mug(s):. If you want to make many mugs, you can buy them in bulk on Amazon.com. I’ve had good luck with the 11oz Sublimation Cup Blank Coffee Mug because they are microwave and dishwasher safe.
- Dye-sub ink: The type and quality of the ink you buy are essential in creating a good-looking and long-lasting mug, so be sure to buy inks specifically designed for sublimation.
- Sublimation transfer paper: High-grade transfer papers apply designs to the blank. You’ll want to find sublimation transfer paper that’s compatible with your ink and your printer. I like the Walakut Sublimation Paper (available at Heat Transfer Warehouse) because it’s easy to use and compatible with the Sawgrass printer.
- Heat-resistant oven mitt. This is necessary to remove the mug from the press.
- Scissors. You’ll need to trim your transfer paper, so your design is easier to tape down on your mug.
- Heat-resistant tape: You’ll need to use heat-resistant tape on your mug; anything else will melt onto your mug in the heat press. The Blue Heat Tape High-Temperature Heat Resistant tape (available at Heat Transfer Warehouse) is great because it always comes off easily and without residue.
How To Sublimate Mugs
Once you have the above materials, you can begin the sublimation process!
1. Choose the Design You Want To Print on Your Mug
You can use programs such as Photoshop or Adobe Illustrator to design your own graphic, or you can use a template from an online library. Be sure to choose the proper size–a typical 11 oz (311.84 gram) mug is three inches high and nine inches wide.
2. Print the Design on Your Sublimation Transfer Paper
Make sure that your printer is loaded with sublimation inks and that you’re printing on the coated side of the paper. Then, trim the paper, so your design is easier to tape down onto the mug. Make sure your paper with your graphic is pressed firmly on the surface.
3. Set Temperature and Timer
Set your sublimation mug press to 400 °F (204.44 °C) and set the timer. This temperature typically works for mug sublimation, but you’ll want to experiment with your own mug press, mugs, and designs to find the right temperature for you.
4. Heat Press Your Mug
Place your mug into the heat press. This is the moment of truth, so be careful not to wrinkle or fold the transfer paper. If you mess up the design, your final image will also have that flaw. Once you’re confident everything is set properly, close the press and begin the sublimation process. Be sure to keep a close eye on your mug and press, fires do happen with these machines and it is always best to keep in the same room. If you start to smell burning paper unplug your press immediately.
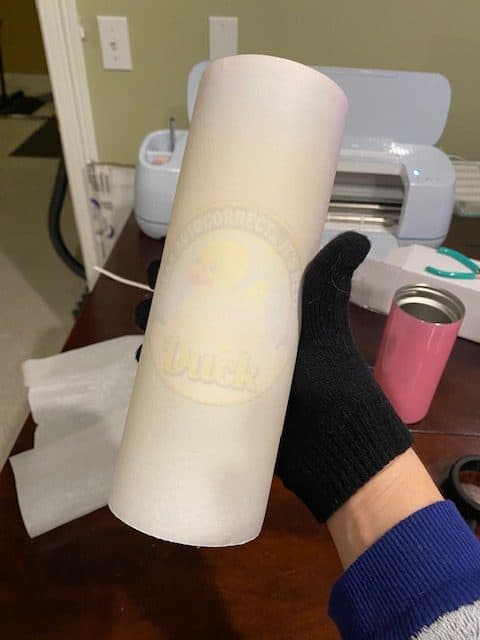
5. Remove Mug With Oven Mitt
After 150-210 seconds, open the press and remove your mug using an oven mitt, so you don’t burn yourself. Remove the transfer from the mug by removing the tape. Try to remove the transfer quickly, as the tumbler is still very hot the process is still working. Then set the mug aside and provide it plenty of time to cool.
6.Care For Your Sublimated Mug
If you want to sell your mugs, 11oz (311.84 gram) wholesale sublimated mugs are typically sold for $13-$15. If your customer customizes the design, you may be able to charge more. The price also varies from place to place, so you’ll need to experiment with different prices as you grow your business.
Caring for your mug is easy. Sublimation mugs are dishwasher and microwave-safe, so you shouldn’t have a problem with washing them.
Conclusion
Sublimating mugs is a great way to have personalized drinkware in your home, create promotional products, or have a fun and lucrative small business. Once you have all the materials and your design picked out, the sublimation process is relatively simple, and the pressing should only take 150-210 seconds. Remember, don’t overcook it or leave it in a room alone.
Be sure to check out some other nifty functional craft ideas through our other posts here on Craft-ILY as well as checking out some videos on DIY and How To’s over on YouTube. Look for “Crafting Unedited” or just click the name in blue to see!
The information is very helpful now my question is that I used sublimation cricut mug, sublimation paper and sublimaton ink I gave it to my daughter with a design and she put the first one in dishwasher and it peeled. Then did another one for her and she washed it regular in sink and also peeled off. Im going crazy trying to find out an answer, can you please help me and also do I go by the instruction of the sublimation paper or booklet of the heat press.
Hi! If it peeled off you got a bad mug. If they are from Cricut call and let them know what happened, they will replace it. If not unfortunately your out a few bucks.